3D Printing Update: Print Your Own Radio-Controlled Yacht!
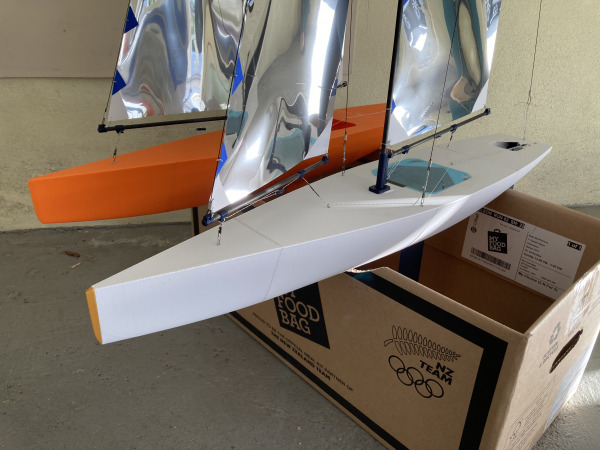
The process to design a 3D printed Racing Sparrow is going well. The first boat had a sea trial which quickly led to a second boat being built.
The Racing Sparrow 3D is 760mm long with a 950mm tall mast and a 950g lead shot bulb.
Update: STL files now available!

An overpowered and sporty RacingSparrow - 15 Gusting 20Kts.
How the prototyping started
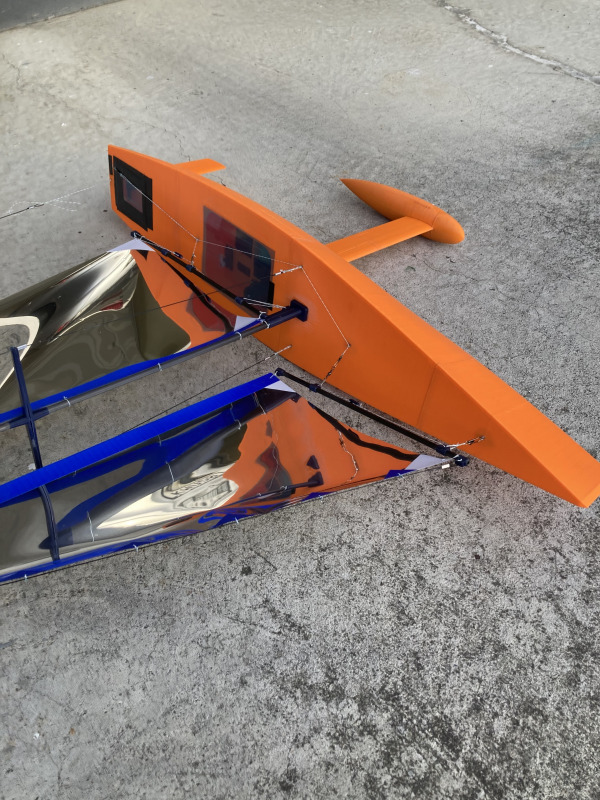
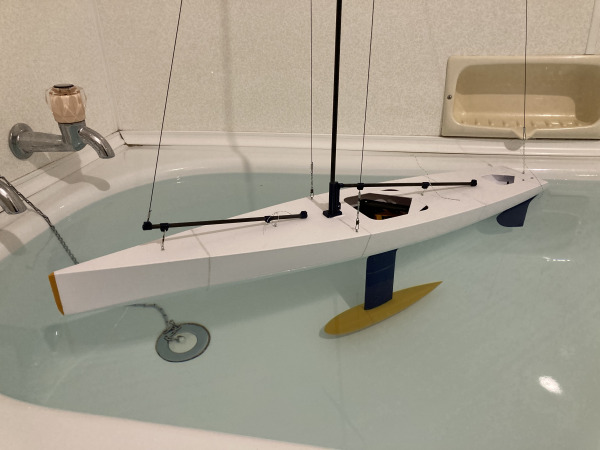
I started off with the orange boat named P1 for prototype, boring I know. P1 had one short sail in low winds. It was a good first sail for the first printed boat but it had some immediate issues that needed to be sorted asap. The main issue was strength around the high load areas and keel. I used 2 x 3mm rods inside the keel but the keel with it's 1050g bulb was really bendy. The side stay attachment points on the deck had bulges from the tension of the rig. After a few weeks sitting in the garage fully tensioned P1 now has big cracks on the deck and would probably sink if it sailed again. I'm keeping her around to remind me of the process I've been through. I then built the white P2. I'm liking P2 a lot!
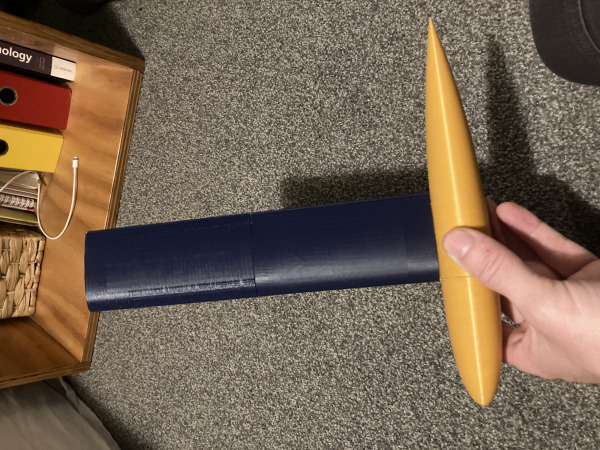
 The 3D printed mast and boom fittings
One thing that did work really well was the rig I made. I designed and printed all the fittings for the mast and booms. The mast is 6mm carbon tube, the booms 5mm tube. Both have 2mm wall thickness. The spreaders I designed are really strong and simply superglue in place as does the gooseneck and attachment points. Super simple and robust so far. For P2 I did adjust the spreader rake and attached the stays and forestay right at the top of the mast to reduce the mast bend. I also reduced the mast by 50mm as I want this boat to be a one rig boat and not need all the sail sizes like IOMs.
 The 3D printed keel design
One of the reasons I reduced the mast size was also that I reduced the bulb weight by 100g on P2. 3D printing boats seems difficult to make a really light weight boat compared to fibreglass and balsa. As a compromise I have reduced bulb weight and therefore a little sail area. I also moved the keel back a whole 20mm to balance the bulb better and reduce keel twist. For P2 I beefed up the keel inner carbon with 3x(4x6) carbon square strip giving a total of 4x18mm carbon inside the keel. It is so strong and is very stiff. I am really happy with the keel and bulb design now weighing 950g.
3D printed rc yacht bulb
The bulb is a 1.5mm skin that is printed in two parts. You fill with 2.5mm lead shot which I got from a gun shop, then fill with runny resin then join the two parts with it's built in flange. I am stoked with how simple and effective this design is. The bulb is only slightly larger than a standard cast bulb. It also allows me to accurately adjust and build an exact weight and shape to spec. Traditionally this is much more difficult to achieve.
3D printed rudder
For P1 I made a rudder to the size on the original RacingSparrow plans which seemed to work fine. For P2 I have made it bigger and thicker. I think for beginner sailors it makes the boat far easier to sail with marginal difference in speed. P2 sure sails well as it stands in heavy winds. The rudder is a solid printed object. I feel you don't want any air cavities under the water line as this effects and negates the lead bulbs job. For the rudder post I have used 3mm carbon rod with a printed hole through the hull. Inside the rudder I also have a second carbon rod to add some strength 3/4 length to prevent a major snap of plastic mid sail. This carbon post design so far is working very well.
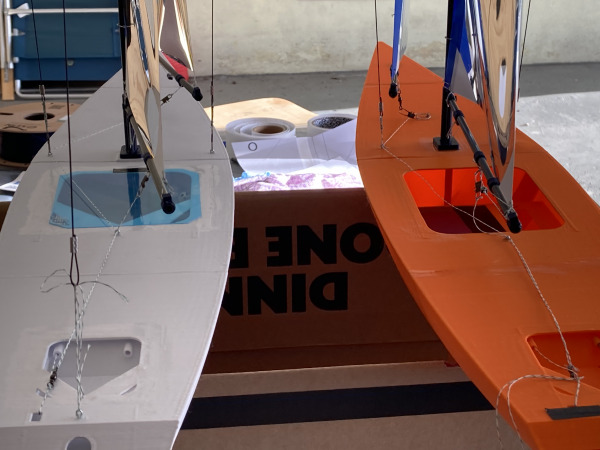
Silver reflective mylar sails
For the sails, you will have noticed the crazy silver reflective material. This turns out is the cheapest form of thin mylar film you can buy in New Zealand online. I bought it from a "Tomato" grow shop. $24 for 7.5 meters at 1.2 wide. I'm not sure about it but I have had some positive comments down at the marina where I test sail here in Nelson, NZ. I could make about 10-15 sets of sails with all that! Great for what I need at present and it builds and sets nicely.
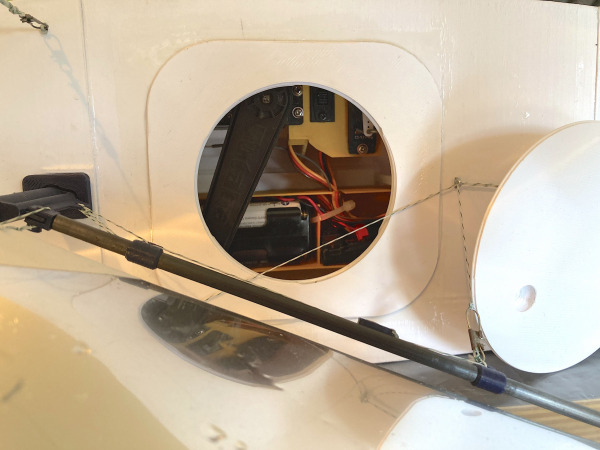 3D printed twist hatch
Today I trialled a twist on main hatch port like you see on a sailing dinghy inspection hatch. I modelled and printed that yesterday and glued it on. It kept the water out even when the boat did a full down the mine submarine impersonation in a big gust. The boat was way over powered in the biggest gust of the day but so much fun to play with and with the big rudder I still had full steerage. The main point here is the hatch kept the water out without mucking around with any tape and I'm really happy with how that performed. It gives me confidence knowing I can guarantee to keep water out every time I sail. And all completely 3D printed.
So what's next for this project?
I have now sailed P2 three times and it is holding up well. I have resolved all the main issues with strength and have sailed in 15-20kt winds just today and it did well. Upwind it is tracking very nicely. You can let go of the controls completely and she sails herself. I have dialled in dual rates for the rudder giving me different amounts of movement at the flick of a switch. Upwind you only need small rudder movements. It's a good trick to sail smoother lines.
However; P3 is already under construction! I have now a much smaller refined list of improvements to build in and test. I have moved the keel forward by 10mm and the bulb back by 3mm. I feel the balance fore and aft needs slight adjustment based on my photos sailing. I have moved the forestay attachment back 20mm to get more rig tension. I will also add a bit more strength in the top rig fitting and a few other small tweaks. I will keep P2 sailing and use it to A/B test with and also means I can take a friend and we can try sink the other persons boat like pirates! I'm semi-kidding... would be fun.
So what has it cost to make P2
Here is a list of parts and cost breakdown to build the P2 white boat.
Total cost: $250NZD in materials. Let's not talk about all the time and fancy 3D printer! that's a whole other story.
$30 PLA+ eSun filament - Any 3D printing shop
$17 Lead shot - Gun Shop (NZ)
$5 Mylar Silver Sail Material - Herbal House
$40 Carbon for keel, mast, booms, rudder post - Flightrc
$4 Split pins - Mitre10
$10 Wire, crimps, Braid line. Burnsco Marine
$27 Super Glue and Araldite 5min Epoxy - Mitre10
$20 Corona Sail Servo 7Kg - Hobby King
$12 Corona 929MG Rudder Servo 2.2Kg - Hobby King
$16.50 Receiver HK-GT2 Waterproof - Hobby King
$8 Futaba - Sail Servo Arm - RCNZ.com
$15 Futaba - 4xAA Battery Holder with Futaba Style Plug - RCNZ.com
$4 SAB - Tiller Arm Single 1/8 Shaft - RCNZ.com
$22 Eneloop Pro AAx4 Batteries - pbtech.co.nz
$30 Other.Misc.
Total: $250NZD
 But.. if you are looking for a good 3D printer the one I use is a Creality K1 Max. They do not sponsor me, although I wouldn't say no nudge nudge.
This printer while a little more expensive than other models has been just simply amazing to use. I'm completely new to this 3D printing as of P1 but I have had no issues with this machine. It is very reliable and user friendly. It auto calibrates itself and I'm getting reliable hassle free printing which leaves me time to design and build. I highly recommend this model and this technique of building. Sure it's not for everyone's taste but if you're on the techy side of life and like building rc yachts the fastest way possible then this is the ticket.
Happy sailing and happy building. I must go and make P3! Stay tuned and no I did not flood the bathroom.